NodeJs.TCP Server 만들기(2)
| 목차 |
| 1. TCP Server 작동 원리 |
| 2. req.js |
| 3. res.js 3.1. send 3.2. sendFile 3.3. static |
| 4. server.js |
1. TCP Server 작동 원리
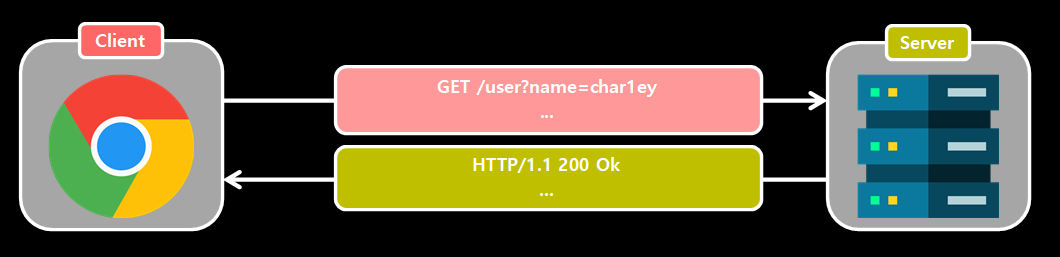
저번 TCP Server 만들기(1)에서는 클라이언트를 직접 만들었지만, 이번에는 크롬 브라우저를 클라이언트로 이용해보도록하자. 저번시간에 했던 내용을 간단하게 되짚어 보도록하자.
통신을 위해 서버와 클라이언트는 서로 요청 메시지와 응답메시지를 주고 받는다.
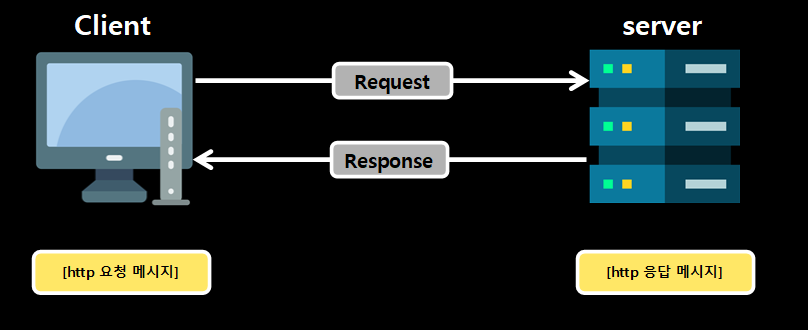
우리가 서버 역할을 하기위해선 클라이언트가 보낸 요청 메시지를 받아 잘 해석하여 무엇을 요청하였는지 파악한 후, 클라이언트에게 응답 메시지를 작성해 주어야한다. 이때 요청과 응답은 HTTP 메시지로 주고 받는데 이 메시지의 형태는 HTTP 프로토콜에 의해 규정된 형태로 정해져있다.
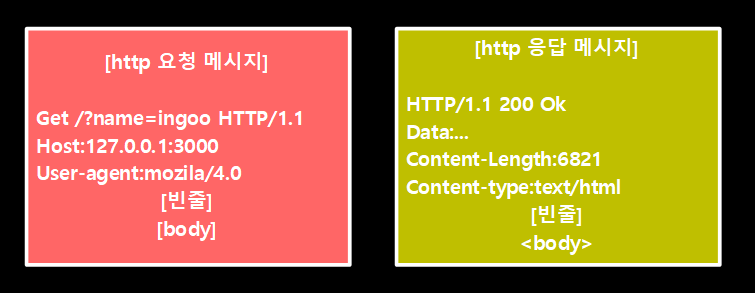
위 형태로 들어온 요청 메시지를 우리가 원하는 형태로 변환한 후에 그에 맞는 응답 메시지를 작성하여 보내주면 통신이 원활하게 이루어 진다.
우리는 Js파일 모듈 형태로 이 과정을 구현해 서버가 처리하도록 만들어야한다.
- 요청 메시지를 처리하는 모듈
- 응답 메시지를 처리하는 모듈
이 두 가지 파일을 만들어 보도록하자.
2. req.js
요청메시지를 받아 처리하는 모듈을 만들어보자.
const getQuery = (queryString) => {
    if(queryString === undefined) return null
    return queryString.split('&').map(v => v.split('=')).reduce((acc, value) => {
        const [key, val] = value
        acc[key] = val
        return acc
    }, {})
}

const bodyParser = (body, contentType) => {
    if ( contentType === undefined) return null

    if ( contentType.indexOf('application/json') !== -1) return JSON.parse(body)
    if ( contentType.indexOf('application/x-www-form-urlencoded') !== -1) return getQuery(body)

    return body
}

const getMessage = (message) => {
    let flag = false
    let body = ""

    for(const key in message) {
        if(flag) body = message.splice(key).map(v => v.trim()).join("")
        if(message[key] === "") flag = true
    }

    message.pop()

    const headers = message.map(v => v.split(":")).reduce((acc, value) => {
        const [key, val] = value
        acc[key] = val
        return acc
    }, {})

    body = bodyParser(body, headers['Content-Type'])

    return [headers, body]
}

const parser = (message) => {
    const header = message.split('\r\n')
    const [method, url, version] = header.shift().split(' ')
    const [path, queryString] = url.split('?')
    const query = getQuery(queryString)

    const [headers, body] = getMessage(header)

    return {method, url, version, path, queryString, query, headers, body}
}

module.exports = parser
코드가 조금 복잡해 보이지만 간단하게 pareser()의 리턴 값으로 객체 형태를 만들어 보낸다는 것이 핵심이다.
요청이 들어온 메시지를 내가 원하는 형태로 변환하여 각각 method, url, version 등의 형태를 객체로 담아냈다.
그리고 module.exports를 이용해 parser라는 함수 자체를 보낼 것이다.
3. res.js
응답 메시지도 모듈로 만들어야한다. 응답 메시지는 서버에서 클라이언트가 요청한 내용을 담아 보내는 것이다.
클라이언트가 간단한 텍스트를 요청한다면 다행이지만 보통은 텍스트보단 파일형태를 요청하고 그 파일은 또 CSS나 Javascript파일을 다시 요청하기도한다. 따라서, 각 요청의 상황에 맞도록 필요한 응답을 주기위해 기능을 구현해야한다.
const readFile = require('./template')

const message = (content, req) => {
    const body = Buffer.from(content)
    let contentType = ''
    if(req.headers.Accept.indexOf('text/html') !== -1) {
        contentType = 'text/html'
    } else {
        contentType = req.headers.Accept
    }
    return`HTTP/1.1 200 OK
Connection:Close
Content-Type:${contentType}; charset=UTF-8
Content-Length:${body.length}

${body.toString()}`
}

module.exports = (socket, req) => {
    return {
        send: (body) => {
            const response = message(body, req)
            socket.write(response)
        },

        sendFile: (filename, obj = {}) => {
            const body = readFile(filename, obj)
            const response = message(body, req)
            socket.write(response)
        },

        sendStatic:(filename) => {
            const defalutDir = `../public`
            const body = readFile(filename, {}, defalutDir)
            const response = message(body, req)
            socket.write(response)
        }
    }
}
module.export로 보내는 부분부터 살펴보자.
콜백함수형태로 보내는데, 콜백은 리턴값으로 객체와 그 안의 메서드들로 구성되어있다. 이 메서드들을 살펴보자.
3.1 send
send 메서드는 아래의 형태로 보내진다.
module.exports = (socket, req) => {
    return {
        send: (body) => {
            const response = message(body, req)
            socket.write(response)
        }
    }
}
body를 인자로 받아, message함수에 body, req를 넣어 클라이언트에게 socket.write로 보내준다.
3.2 sendFile
sendFile 메서드도 마찬가지로 send와 같은 역할을 한다.
module.exports = (socket, req) => {
    return {
        sendFile: (filename, obj = {}) => {
            const body = readFile(filename, obj)
            const response = message(body, req)
            socket.write(response)
        }
    }
}
차이점이 있다면, 파일형태로 받기 때문에 파일형태를 한번 더 처리해 주어야한다. 그래서 template.js라는 모듈을 또 하나 만들어 준다.
template.js
const fs = require('fs')
const path = require('path')

module.exports = (filename, obj = {}, defalutDir = '../views') => {
    const target = path.join(__dirname, defalutDir, filename)
    let readline = fs.readFileSync(target, 'utf8')

    for (const key in obj) {
        readline = readline.replaceAll(`{{${key}}}`, obj[key])
    }

    return readline
}
template파일에서는 fs, path를 가져온 후에 우리가 원하는 파일에 대한 응답을 위해 경로를 찾아, fs.readFile을 통해 해당 파일을 읽어 string형태로 바꾸어 주는 역할을 한다.
다시 sendFile 메서드로 돌아와서, 매개변수로 filename을 받아 template의 콜백을 실행시킨 후 결과값을 body에 담아 send와 마찬가지 과정을 거쳐 response 메세지를 보낸다.
module.exports = (socket, req) => {
    return {
        sendFile: (filename, obj = {}) => {
            const body = readFile(filename, obj)
            const response = message(body, req)
            socket.write(response)
        }
    }
}
3.3 sendStatic
sendStatic 메서드는 sendFile과 비슷한 역할이지만, 이 메서드는 CSS 파일이나 JS 파일과 같은 요청을 처리하기 위해 만들어 놓은것이다. CSS, JS 파일을 불러오라는 요청을 받았을 경우 해당 경로를 이용해 readFile을 실행하여 string을 받아온다. 즉, CSS와 JS파일의 경로를 넣어야된다.
module.exports = (socket, req) => {
    return {
        sendStatic:(filename) => {
            const defalutDir = `../public`
            const body = readFile(filename, {}, defalutDir)
            const response = message(body, req)
            socket.write(response)
        }
    }
}
4. server.js
이제 마지막으로 응답을 보내는 주체인 서버로 돌아와서 위의 과정들을 다 한데 엮어야한다.
현재 상황은 요청 메시지의 형변환을 모듈( req.js )로 만들었고, 응답 메시지의 형변환 또한 모듈( res.js )로 만들어져있다.
이제 서버에서는 이 메시지들을 상황에 맞도록 보내야 한다. 경우의 수를 생각하여 분기처리를 해주어야 올바르게 서버로서의 작동을 할 수 있다.
const net = require('net')
const resFn = require('./lib/res')
const reqFn = require('./lib/req')
const static = require('./lib/static')

const PORT = process.env.SERVER_PORT || 3000
const HOST = process.env.SERVER_HOST || '127.0.0.1'

const server = net.createServer((socket) => {
    socket.setEncoding('utf8')

    socket.on('data', (chunk) => {
        const req = reqFn(chunk)
        const res = resFn(socket, req)

        for (const path in static) {
            if(req.method === 'GET' && req.path === path){
                res.sendStatic(path)
            }
        }

        if(req.method === 'GET' && req.path === '/') {
            const name = req.query?.name
            res.sendFile('index.html', { name })
        } else if(req.method === 'GET' && req.path === '/list') {
            res.sendFile('list.html')
        } else if(req.method === 'GET' && req.path === '/view') {
            res.sendFile('view.html')
        } else if(req.method === 'GET' && req.path === '/write') {
            res.sendFile('write.html')
        } else if(req.method === 'GET' && req.path === '/modify') {
            res.sendFile('modify.html')
        }
    })
})


server.on("connection", () => {``
    console.log('connected to client')
})

server.listen(PORT, HOST, () => {
    console.log('server start')
})
서버의 동작은 저번에 봤던 것과 같다. 하지만, 데이터를 chunk, socket으로 받았을 때, 알맞게 처리할 수 있도록 res, req를 가져와 해당 상황에 맞게 처리할 수 있도록 설정해놓은 것이다.
static.js
const fs = require('fs')
const path = require('path')

const root = 'public' // 여기서 부터 찾을것이다.
const rootDir = path.join(__dirname, '../', root)

// 파일이 나올떄마다 값을 넣어준다.
let result = {}

const find = (currentPath) => {
    const directory = fs.readdirSync(currentPath)
    for(const index in directory){
        const findPath = path.join(currentPath, directory[index])
        const isFile = fs.statSync(findPath).isFile()

        // 디렉토리일 경우
        // 한번 더 디렉토리에 들어가야한다.
        if(!isFile){
            find(findPath)
        // 파일일 경우
        // 파일을 찾으면 끝낸다.
        } else {
            const key = currentPath === rootDir ? '/' : currentPath.replaceAll(rootDir, '')
            //findPath : currentPath + directory[index]

            const httpPath = path.join(key, directory[index])

            result[httpPath] = directory[index]
        }
    }

    return result // Object
}
// 객체를 보내야한다.
// 함수 호출이 아닌 결과물을 넘기는 것이다.
module.exports = find(rootDir)
static.js 에서는 원하는 파일을 찾을 수 있도록 원하는 파일의 경로를 받아, 각 파일의 있는 경로를 객체로 넘긴다. 이 파일의 내용은 마지막 포스트에서 세세하게 설명하도록 하자.
static을 이용해 처리한 후에, 아래로 내려가서 if문으로 각각의 상황에 대한 분기처리를 해준다.
req에서 만들어낸 method, path등을 이용해 해당 요청이 맞으면, 어떤 파일을 보낼지 정해준것이다.
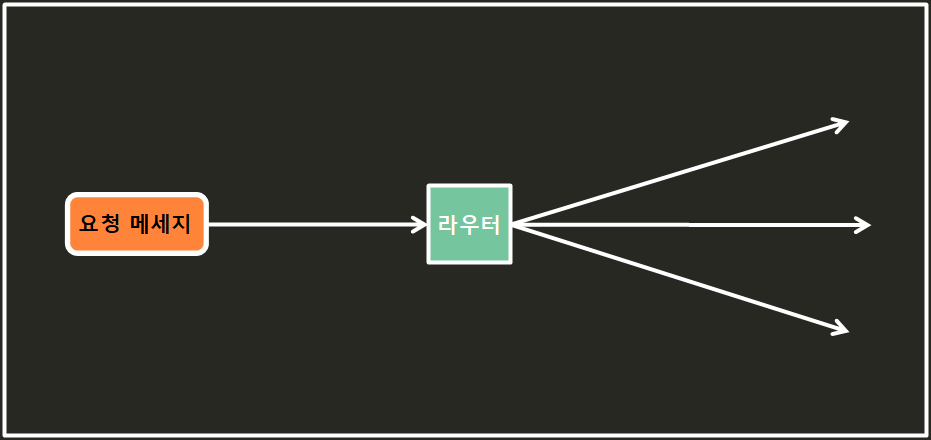
(위와 같은 역할을 라우터라고 한다.)
간단하게 그리면 이런 역할이었지만 세부적으로 들어가보면,

중간에 for in 문으로 이루어진 부분을 미들웨어, 그 후에 진행되는 분기점을 라우터라고 한다.
비슷해 보이지만, 그림으로 보면 느낌이 조금 다른 점이 있다.
미들웨어
네트워크 연결에서 서로 다른 애플리케이션이 통신하는데 사용되는 소프트웨어를 말한다.
중간에 낀 서버의 역할을 한다고 생각하자.
우리가 적은 코드를 봤을 때, 라우터와는 다르게 어떤 요청이 오던간에 무조건 실행을 한 뒤 다음 코드로 넘어간다.
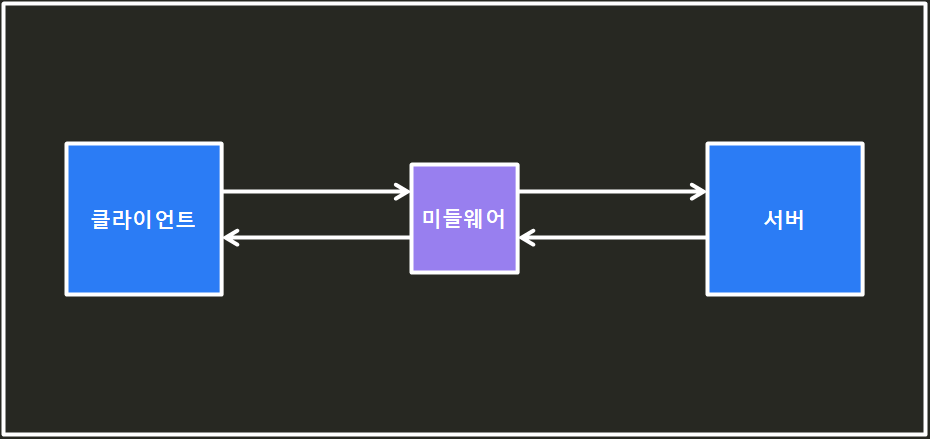
라우터
들어온 요청에 따라 분기를 나누는 스위치(Switch)라고도 하며, 보통 라우터라고 부른다.
데이터의 경로를 알맞은 곳으로 가게끔 나누는 역할을 한다.
미들웨어와 라우터에 대해서는 아직 설명이 부족한 점이 있지만, 너무 깊이 알면 오히려 독이 될 수 있으므로 여기까지 알고, 기술부채로 남겨두도록하자.