2023. 4. 19. 17:00ㆍJavaScript/Typescript
목표
'상품명'과 '가격'이 있는 임의의 제품에 대해서 '할인'을 적용 시킨다.
기존에 배운 방식으로 상품의 할인을 적용한다면 구현은 가능하다.
하지만 유지보수가 힘들어 매번 코드를 전체적으로 수정해야한다.
따라서 기존의 코드를 수정하지 않고, 조건문을 최대한 사용하지 않는 선에서 코드를 작성해 나가야한다.
이렇게 작성하면 유지보수 측면에서 상당히 유리하게 작업을 할 수 있다.
구현순서 및 규칙
- 상품(제품)의 구조(상품명, 가격)를 정의하는 클래스를 구현한다.
- 상품에 대해서 할인을 적용한다.( 단, 기존의 코드를 수정을 최소한으로 한다. )
- 이후 다른 방식으로 할인을 추가할 때 기존의 코드를 수정하지 않도록 한다.
실습코드 구현
우선, 상품 객체의 구조를 작성한다.
상품은 상품명과 가격을 인자로 받아생성한다.
다만, private을 사용하여 가격에 직접적인 접근은 불가하도록 하고,
오로지 메서드로만 가격을 출력하거나 변경할 수 있도록 작성했다.
아래의 클래스는 SOLID 원칙 중에서 SRP(단일 책임 원칙)과 OCP(개방폐쇠원칙)을 지키고있다.
상품의 대한 정보를 제공하는 책임만을 지고 있고(SRP),
상품의 정보를 제공하는 역할을 변경하지 않고도, 정보를 다양하게 사용이 가능하다.
따라서, 확장에는 열려있고 변경에는 닫혀있어 OCP를 만족시킨다.
물론 나머지 SOLID 법칙들도 조금씩 지켜지고있다.
class Products {
    private name: string
    private price: number

    constructor(name: string, price: number){
        this.name = name
        this.price = price
    }

    getName(): string {
        return this.name
    }

    getPrice(): number {
        return this.price
    }
}
다음으로 작성이 필요한 코드는 할인에 대한 코드이다.
할인을 어떤식으로 적용하고 기존의 코드를 수정하지 않은 채로 구현이 가능할지 생각해보자.
할인을 적용하기 위해서 필요한 것은 상품의 가격과 얼마를 할인할 지 할인가격 또는 할인률에 대한것이 필요하다.
상품의 정보는 위의 클래스를 인스턴스화 하면 사용이 가능해진다.
따라서 얼마나 할인을 할 지 나타내주는 코드, 기능이 필요하다.
이를 클래스로 따로 빼서 사용해보도록하자.
클래스를 만들기 전에 정해야 할 것이 있는데
위에서 구현한 Products 클래스를 상속할지 아닌면 의존성을 주입하여야 할 지 정해야 한다.
클래스를 상속받게 되면 인자로 상품명, 가격 등을 직접 받아야 하므로 유지 보수측면에서 좋지 않아보인다.
그러므로 Products 클래스를 상속받지 않고 의존성 주입을 통해서 가격의 정보를 받아오도록 하자.
class ProductDiscount {
    private product: Products
    privat discount: number

    constructor(product: Products, discount: number){
        this.product = product
        this.discount = discount
    }

    getPrice(): void {
        console.log(this.product.getPrice() - this.discount)
    }
 }

const discount = 50_000

const mac = new Products("macAir", 1_000_000)
const ms = new Products("window", 800_000)

const macDiscount = new ProductDiscount(mac, discount)
const msDiscount = new ProductDiscount(ms, discount)

macDiscount.getPrice() // 950,000
msDiscount.getPrice() // 750,000
위의 discount라는 변수처럼 가격으로 나와있다면 이를 가능하게 하는데,
일반적으로 상품은 할인율을 적용하여 할인을 하는 곳도 많이있다.
할인율을 적용하기 위해서는 조건문을 이용해서 처리하는 방법도 있지만,
금액으로 할인 후 할인율 적용, 할인율 적용 후 금액으로 할인 등등
뭔가 새로운 할인을 적용할 때마다 조건을 걸어줘야 하기때문에 조금 번거로울 수도 있고,
최대한 조건문을 쓰지 않기로 했기 떄문에 다른 방법으로 구현해야한다.
따라서 할인할 금액을 구하기 위한 기능을 가진 클래스가 필요하다.
할인할 금액을 구하는 기능을 가진 클래스를 만들어 보도록 하자.
공통적으로 할인할 금액을 구해야하기 때문에 typescript의 interface를 사용해서 구조를 만들어보자.
interface Discount {
    getDiscountPrice(price: number): number
}
지금부터 만들 클래스는 4 종류인데
- 할인률
- 할인금액
- 할인률 적용후 할인금액 적용
- 할인금액 적용후 할인률 적용
모두 위의 interface를 implements하여 만들것이다.
순서대로 클래스를 구현해 보도록하자.
// 할인률
class PercentDiscount implements Discount {
    private amount: number
    constructor(amount: number){
        this.amount = amount
    }

    getDiscountPrice(price: number): number {
        return price * (1 - this.amount / 100)
    }
}

// 할인금액
class FlatDiscount implements Discount {
    private amount: number
    constructor(amount: number){
        this.amount = amount
    }

    getDiscountPrice(price: number): number {
        return price - this.amount
    }
}

// 할인률 적용후 금액할인
class PercentFlatDiscount implements Discount {
    private percentAmount : number
    private flatAmount : number
    constructor(percent: number, flat: number){
        this.percentAmount = percent
        this.flatAmount = flat
    }

    getDiscountPrice(price: number): number {
        const PercentDiscountAmount = price * (1 - this.percentAmount / 100)
        return PercentDiscountAmount - this.flatAmount
    }
}

// 금액할인 후 할인률 적용
class FlatPercentDiscount implements Discount {
    private flatAmount : number
    private percentAmount : number
    constructor(flat: number, percent: number){
        this.flatAmount = flat
        this.percentAmount = percent
    }

    getDiscountPrice(price: number): number {
        const flatDiscountAmount = price - this.flatAmount
        return flatDiscountAmount * (1 - this.percentAmount / 100)
    }
}
위의 클래스들은 상품의 할인율, 할인금액을 인자로 받는다.
그리고 공통적으로 getDiscountPrice라는 메서드를 가지고 있다.
이를 이용해서 위에서 구현한 ProductDiscount를 다시 구현해보도록 하자.
class ProductDiscount {
    private product: Products
    private discount: Discount

    constructor(product: Products, discount: Discount){
        this.product = product
        this.discount = discount
    }

    getPrice(): void {
        console.log(this.discount.getDiscountPrice(this.product.getPrice()))
    }
}
다시 구현한 ProductDiscount는 인자로 상품 인스턴스와 할인 인스턴스를 받는다.
위에서 구현한 4가지 클래스 모두 interface Discount를 implements를 했기 때문에 에러를 나타내지 않는다.
이를 이용해서 할인금액, 할인율을 통한 상품의 가격을 구해보자.
const percent = 10
const flat = 50_000

const mac = new Products("macAir", 1_000_000)

const macPer = new PercentDiscount(percent) // :Discount
const macFlat = new FlatDiscount(flat) // :Discount
const macFlatPer = new FlatPercentDiscount(flat, percent) // :Discount
const macPerFlat = new PercentFlatDiscount(percent, flat) // :Discount

const macPerDiscount = new ProductDiscount(mac, macPer)
const macFlatDiscount = new ProductDiscount(mac, macFlat)
const macFlatPerDiscount = new ProductDiscount(mac, macFlatPer)
const macPerFlatcount = new ProductDiscount(mac, macPerFlat)

macPerDiscount.getPrice() // 900,000
macFlatDiscount.getPrice() // 950,000
macFlatPerDiscount.getPrice() // 855,000
macPerFlatcount.getPrice() // 850,000
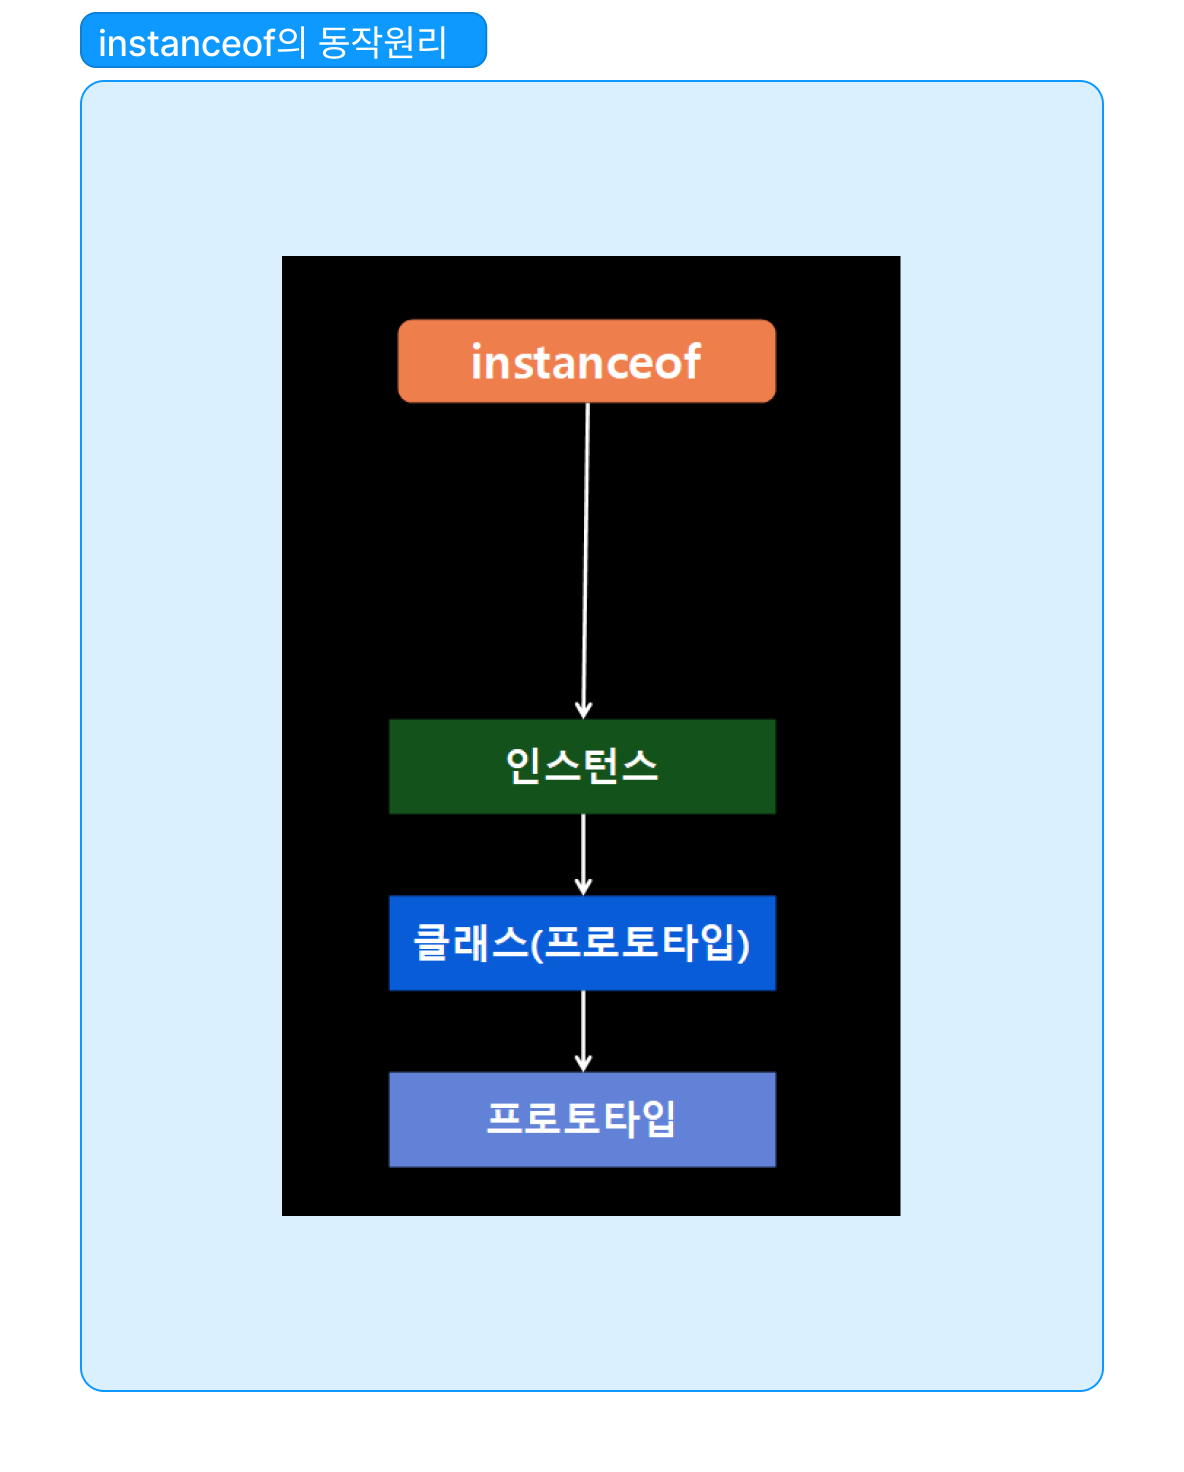
위 처럼 구현이 되는데 이는 instanceOf의 동작원리를 이용해서 작성된 것이다.
instanceOf는 가장 위에 있는 클래스에서부터 아래로 내려가면서 값을 찾아간다.
4가지 각각의 클래스가 가장 위에있는 클래스이므로 getDicountPrice()를 각각의 클래스에 맞게 사용되었다.
전체 코드
interface Discount {
    getDiscountPrice(price: number): number
}

// 금액을 적용한 뒤 할인율 적용하여 깎음

class FlatPercentDiscount implements Discount {
    private flatAmount : number
    private percentAmount : number
    constructor(flat: number, percent: number){
        this.flatAmount = flat
        this.percentAmount = percent
    }

    getDiscountPrice(price: number): number {
        const flatDiscountAmount = price - this.flatAmount
        return flatDiscountAmount * (1 - this.percentAmount / 100)
    }
}

// 할인을 적용한 뒤 금액을 깎음

class PercentFlatDiscount implements Discount {
    private percentAmount : number
    private flatAmount : number
    constructor(percent: number, flat: number){
        this.percentAmount = percent
        this.flatAmount = flat
    }

    getDiscountPrice(price: number): number {
        const PercentDiscountAmount = price * (1 - this.percentAmount / 100)
        return PercentDiscountAmount - this.flatAmount
    }
}

// 일정 금액으로 깎는 것

class FlatDiscount implements Discount {
    private amount: number
    constructor(amount: number){
        this.amount = amount
    }

    getDiscountPrice(price: number): number {
        return price - this.amount
    }
}

// 할인률로 깎는 것

class PercentDiscount implements Discount {
    private amount: number
    constructor(amount: number){
        this.amount = amount
    }

    getDiscountPrice(price: number): number {
        return price * (1 - this.amount / 100)
    }
}

// =========================================================================================

class Products {
    private name: string
    private price: number

    constructor(name: string, price: number){
        this.name = name
        this.price = price
    }

    getNmae(): string {
        return this.name
    }

    getPrice(): number {
        return this.price
    }
}

class ProductDiscount {
    private product: Products
    private discount: Discount

    constructor(product: Products, discount: Discount){
        this.product = product
        this.discount = discount
    }

    getPrice(): void {
        console.log(this.discount.getDiscountPrice(this.product.getPrice()))
    }
}

const percent = 10
const flat = 50_000

const mac = new Products("macAir", 1_000_000)

const macPer = new PercentDiscount(percent) // :Discount
const macFlat = new FlatDiscount(flat) // :Discount
const macFlatPer = new FlatPercentDiscount(flat, percent) // :Discount
const macPerFlat = new PercentFlatDiscount(percent, flat) // :Discount

const macPerDiscount = new ProductDiscount(mac, macPer)
const macFlatDiscount = new ProductDiscount(mac, macFlat)
const macFlatPerDiscount = new ProductDiscount(mac, macFlatPer)
const macPerFlatcount = new ProductDiscount(mac, macPerFlat)

macPerDiscount.getPrice() // 900,000
macFlatDiscount.getPrice() // 950,000
macFlatPerDiscount.getPrice() // 855,000
macPerFlatcount.getPrice() // 850,000
전체 코드는 위와 같으면 그림으로 흐름을 나타내보자면 아래와 같이 나타낼 수 있다.
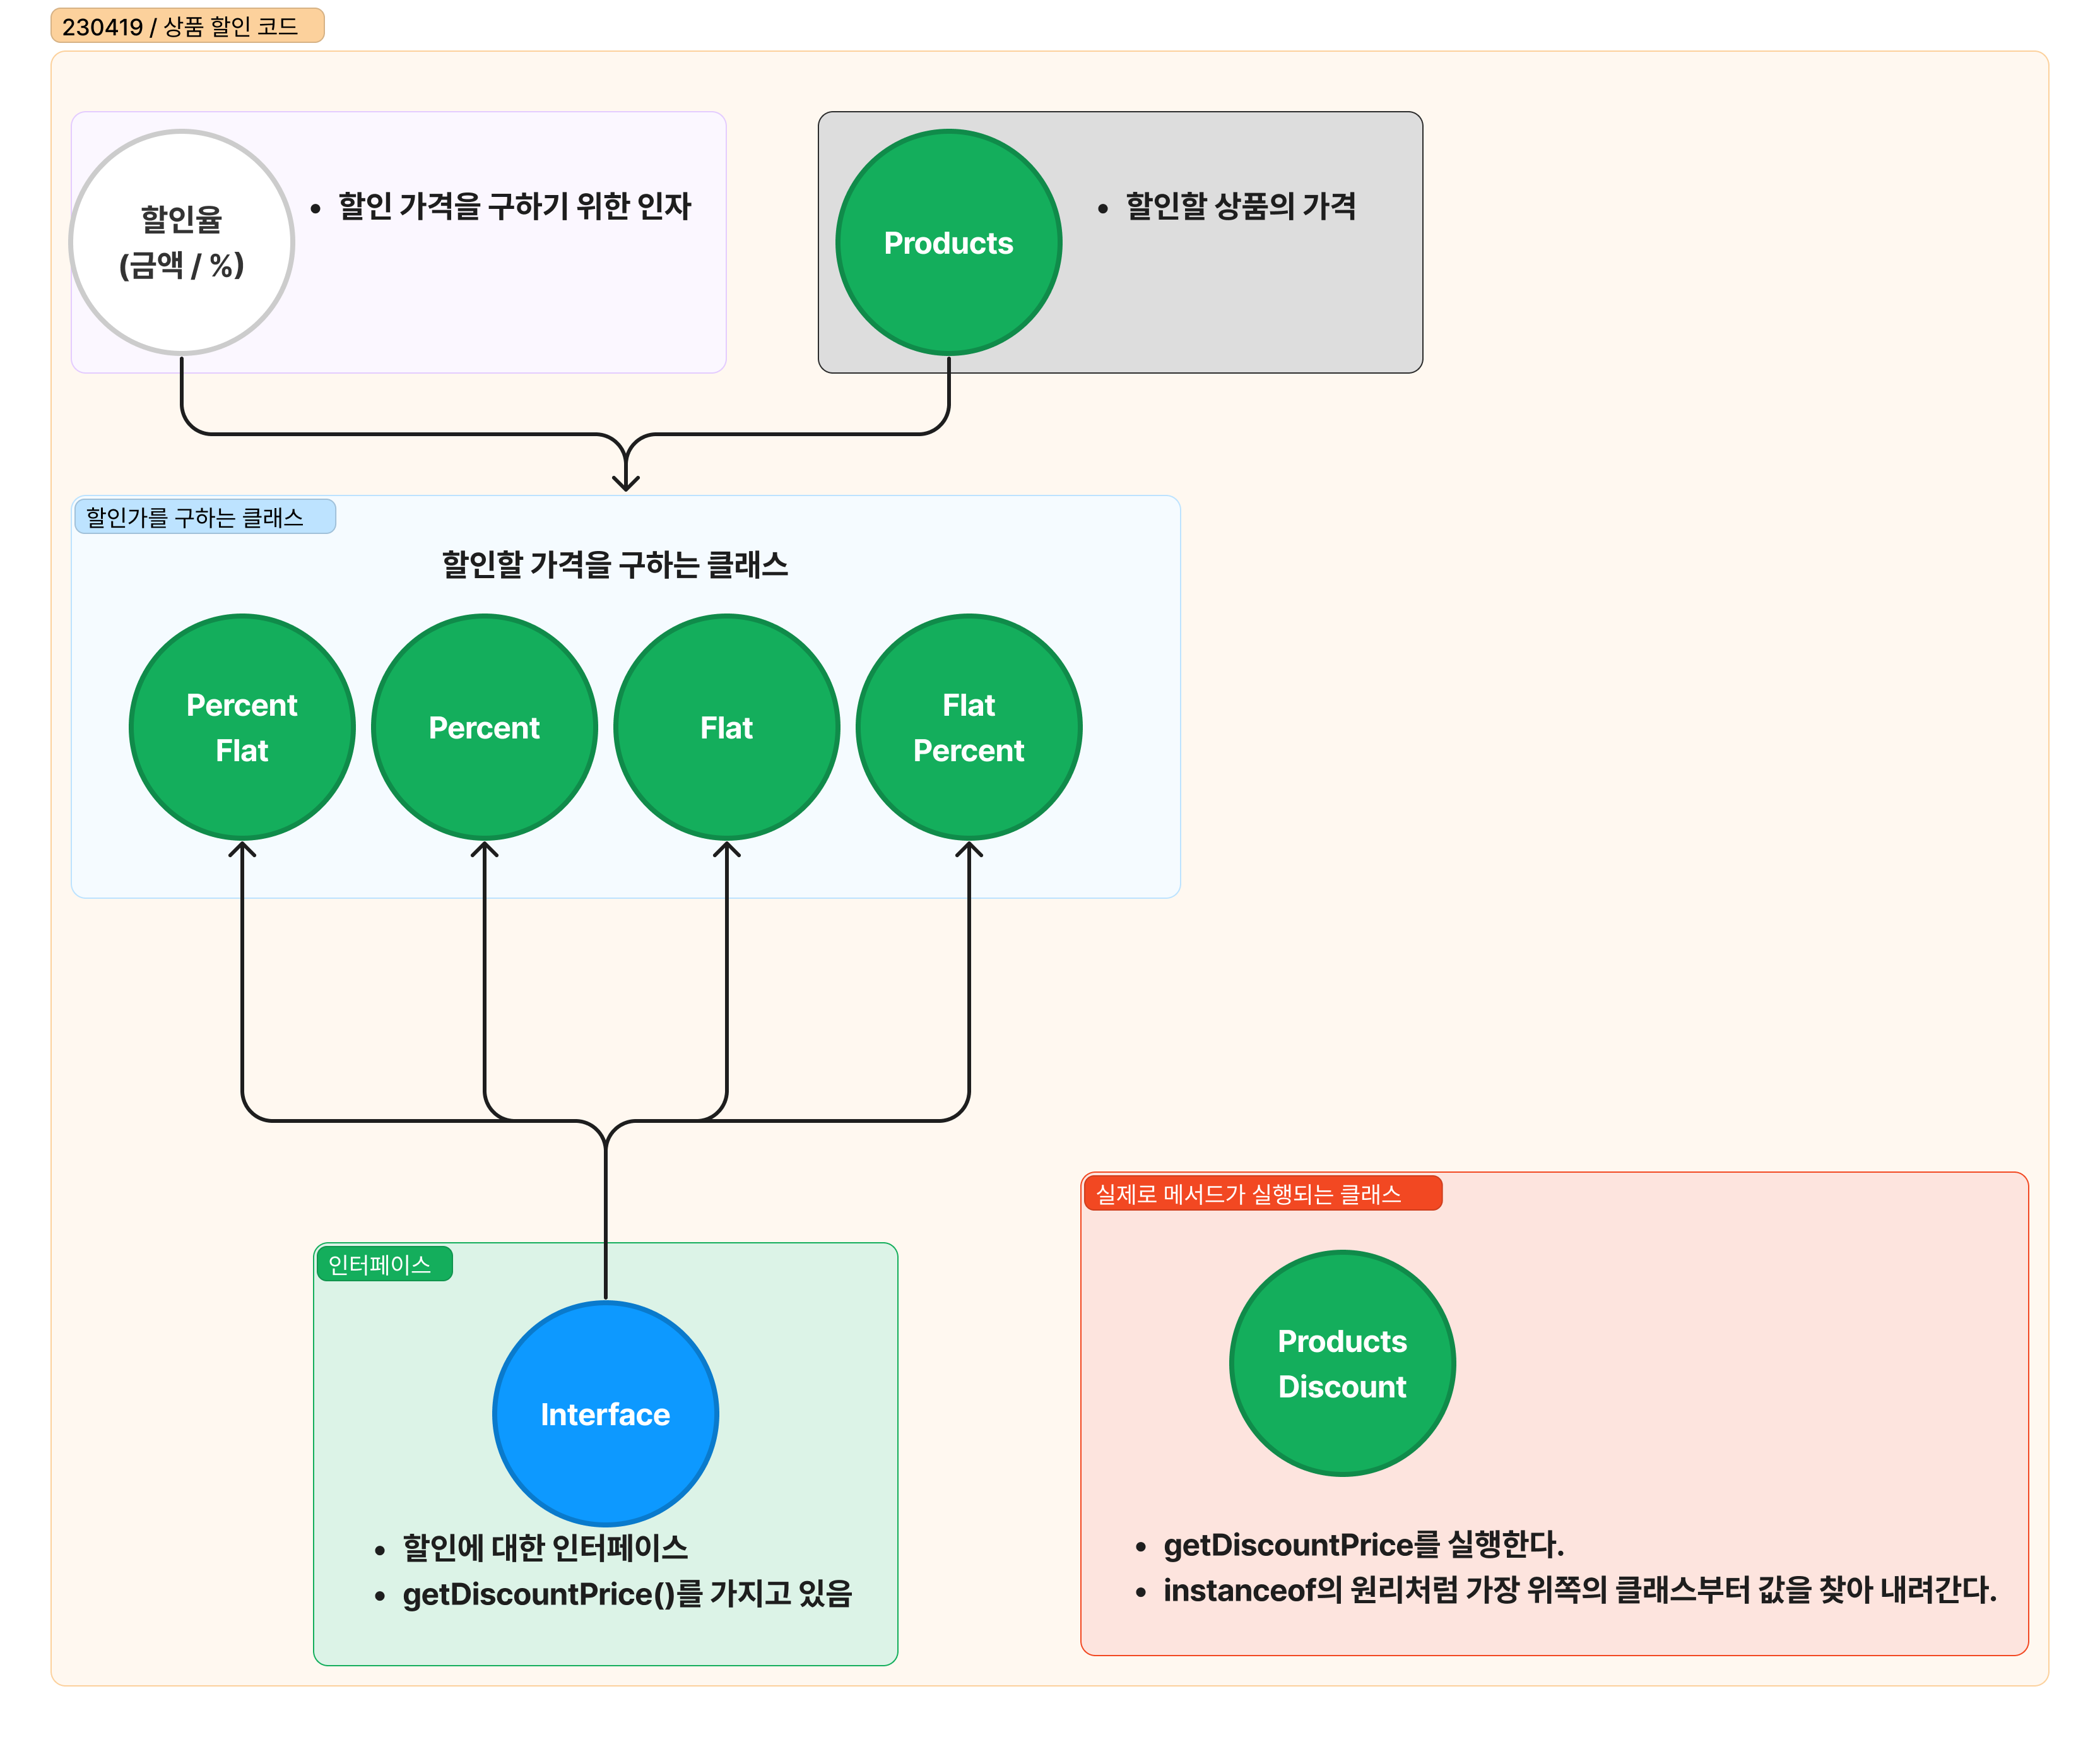
초록색은 클래스, 파란색은 인터페이스, 하얀색은 변수이다.
선언은 4가지 할일할 가격을 구하는 클래스에서 했지만
실행은 ProductsDiscount에서 된다.
선언부분과 실행부분이 다르다는 것에 유의하자.
'JavaScript > Typescript' 카테고리의 다른 글
| 전략패턴 실습코드(230420) (0) | 2023.04.23 |
|---|---|
| 타입스크립트 문법(2) (0) | 2023.04.20 |
| 타입스크립트 문법(1) (0) | 2023.04.19 |
| 타입스크립트 기본설정하기 (0) | 2023.04.18 |
| 타입스크립트(Typescript)란? (0) | 2023.04.18 |