2023. 4. 23. 03:52ㆍJavaScript/Typescript
1. 전략패턴(Strategy Pattern)
전략 패턴(Strategy Pattern)은 알고리즘을 클래스로 캡슐화하고, 런타임 시에 유연하게 변경할 수 있도록 한다.
전략 패턴(Strategy Pattern)은 알고리즘이 동적으로 변경되거나, 다양한 방법으로 동작해야 하는 경우에 사용된다.
전략패턴의 구성 요소
Context
전략 객체를 사용하는 주체이다.
전략 객체를 사용할 때는 Context 객체에서 인터페이스를 호출한다.
Strategy
Context 객체에서 사용되는 알고리즘을 캡슐화하는 인터페이스이다. 전략 패턴의 핵심이다.
Concrete Strategy
Strategy 인터페이스를 구현하는 클래스이다.
다양한 알고리즘을 구현하는데 사용된다.
전략패턴의 장점
1. 알고리즘을 캡슐화하여 코드 재사용성을 높여준다.
2. 전략 객체를 교체하여 쉽게 새로운 알고리즘을 추가할 수 있다.
3. Context 객체와 Strategy 객체가 독립적으로 변경될 수 있어 유연한 설계가 가능하다.
2. 실습코드
실습코드를 작성하기 전에 우선 전체적인 흐름과 어떤 기능, 역할이 필요한지 알아야한다.
흐름
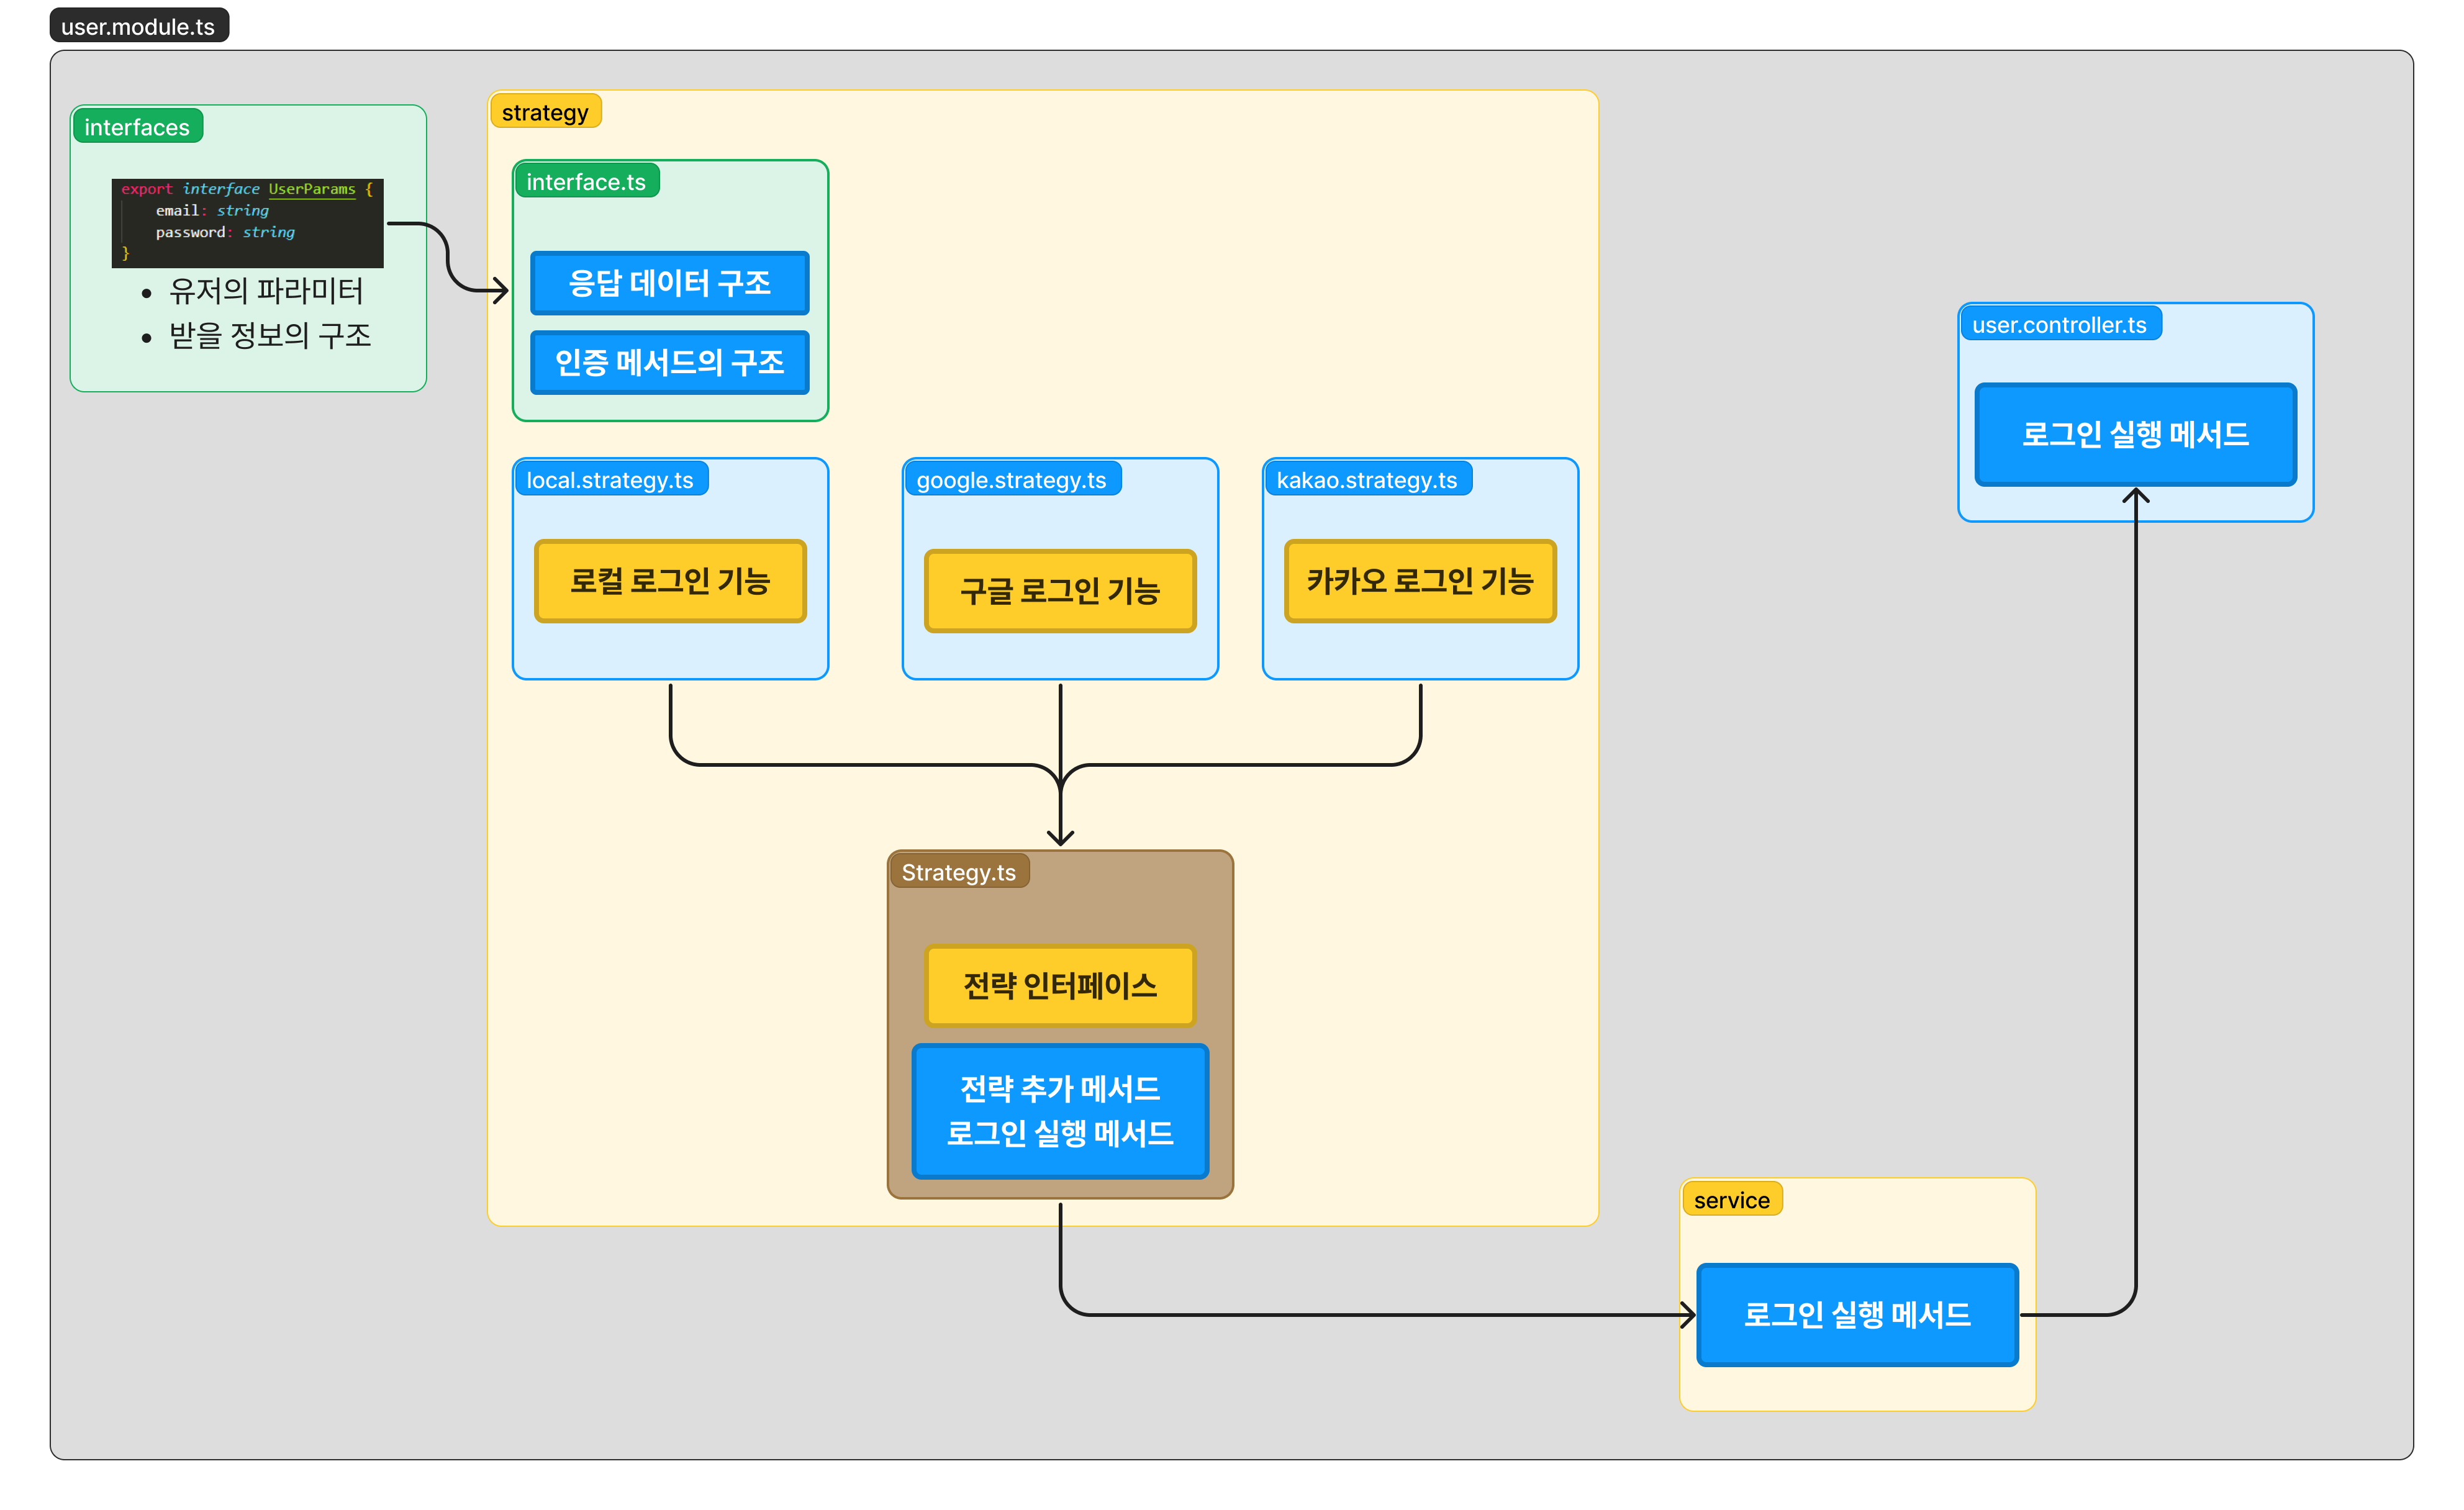
여기서 각 로그인(로컬, 카카오, 구글)의 로직은 각각의 클래스로 구현하고
구현된 로직들은 전략 클래스에 추가해서 서비스로 보내고 그를 컨트롤러에 보내는 로직이다.
(물론 화살표 방향은 응답의 방향이다.)
이 로직이 실행되는 곳은 module.ts이다.
흐름도의 순서대로 코드를 작성해보도록 하자.
login.request.interface.ts
로그인 시 유저가 입력할 정보들이다. 이를 받아서 로그인을 진행한다.
이런 형식으로 받는다는 구조만 정의해놓은 파일(인터페이스)이다.
export interface UserParams {
    email: string
    password: string
}
Authenticatore.interface.ts
이 곳은 로그인을 로직을 수행하는 인터페이스를 정의하는 곳이다.
로그인 인증 요청과 응답에 관한 인터페이스가 정의되어있다.
import { UserParams } from "../interfaces/login.request.interface"

export interface AuthenticationResponse {
    success: boolean
    message?: string
}

export interface Authenticator {
    authenticate(credentials: UserParams): Promise<AuthenticationResponse>
}
google/kakao/local.strategy.ts
각 로그인별 인증 로직을 구현하는 곳이다.
앞으로 다른 로그인을 추가해야한다면 파일을 만들어서 추가하면된다.
아래는 순서대로 작성된 각각의 코드이다.
import { UserParams } from "../interfaces/login.request.interface"
import { AuthenticationResponse, Authenticator } from "./Authenticator.interface"

export class GoogleAuthenticator implements Authenticator {
    async authenticate(credentials: UserParams): Promise<AuthenticationResponse> {
        // 카카오 로그인 로직
        console.log("google login?")
        return { success: true }
    }
}
import { UserParams } from "../interfaces/login.request.interface"
import { AuthenticationResponse, Authenticator } from "./Authenticator.interface"

export class KakaoAuthenticator implements Authenticator {
    async authenticate(credentials: UserParams): Promise<AuthenticationResponse> {
        // 카카오 로그인 로직
        console.log("kakao login?")
        return { success: true }
    }
}
import { UserParams } from "../interfaces/login.request.interface"
import { AuthenticationResponse, Authenticator } from "./Authenticator.interface"

export class EmailAuthenticator implements Authenticator {
    async authenticate(credentials: UserParams): Promise<AuthenticationResponse> {
        // 로직부분
        console.log("local 로그인?")
        return { success: true }
    }
}
Strategy.ts
각 로그인 전략이 추가되는 곳이다.
여기에서는 각 카카오, 구글, 로컬 등의 로그인의 로직을 받아서 수행만 하는 곳이다.
각 로그인 알고리즘은 바로 위의 코드에서 선언되어있다.
선언과 수행이 다른 곳에서 된다는 점을 인지하자.
import { UserParams } from "../interfaces/login.request.interface"
import { AuthenticationResponse, Authenticator } from "./Authenticator.interface"

interface IStrategy {
    [key: string]: Authenticator
}

class Strategy {
    private strategy: IStrategy = {}
    constructor() {}

    public set(key: string, authenticate: Authenticator) {
        this.strategy[key] = authenticate
    }

    public async login(type: string, credentials: UserParams): Promise<AuthenticationResponse> {
        const result = await this.strategy[type].authenticate(credentials)
        return result
    }
}

export default Strategy
user.service.ts
여기서는 위의 strategy.ts에 구현된 login을 수행하는 곳이다.
구현은 strategy.ts에 되어있지만 수행은 이곳 service.ts에서 한다.
import { UserParams } from "../interfaces/login.request.interface"
import { AuthenticationResponse } from "../strategy/Authenticator.interface"
import Strategy from "../strategy/Strategy"

class UserService {
    constructor(private readonly strategy: Strategy) {}

    async login(type: string, credentials: UserParams): Promise<AuthenticationResponse> {
        const result = await this.strategy.login(type, credentials)
        return result
    }
}

export default UserService
user.controller.ts
여기서는 브라우저에서 정보를 받아 서비스로 넘긴다.
service.ts에서 구현된 메서드는 이곳에서 수행된다.
import { UserParams } from "./interfaces/login.request.interface"
import UserService from "./service/user.service"

class UserController {
    constructor(private readonly userService: UserService) {}

    // localhost:3000/login/:type
    signin() {
        // req.body
        const loginParmas: UserParams = {
            email: "web7722",
            password: "1234",
        }

        this.userService.login("google", loginParmas)
    }
    signup() {}
}

export default UserController
user.module.ts
실제로는 이곳에서 모든 클래스의 메서드가 수행되는 곳이다.
Context 객체라고 할 수 있다.
이곳에서 구현된 모든 클래스를 생성하고 의존성을 주입하고,
구현된 클래스의 메서드를 여기서 수행한다.
엔트리 포인트라고 할 수도 있다.
import UserService from "./service/user.service"
import Strategy from "./strategy/Strategy"
import { GoogleAuthenticator } from "./strategy/google.strategy"
import { KakaoAuthenticator } from "./strategy/kakao.strategy"
import { EmailAuthenticator } from "./strategy/local.strategy"
import UserController from "./user.controller"

const strategy = new Strategy()
strategy.set("local", new EmailAuthenticator())
strategy.set("kakao", new KakaoAuthenticator())
strategy.set("google", new GoogleAuthenticator())

const userService = new UserService(strategy)
const userController = new UserController(userService)

userController.signin()
로컬 로그인을 선택했다면 이렇게 흐름이 진행된다.
로컬 로그인 요청
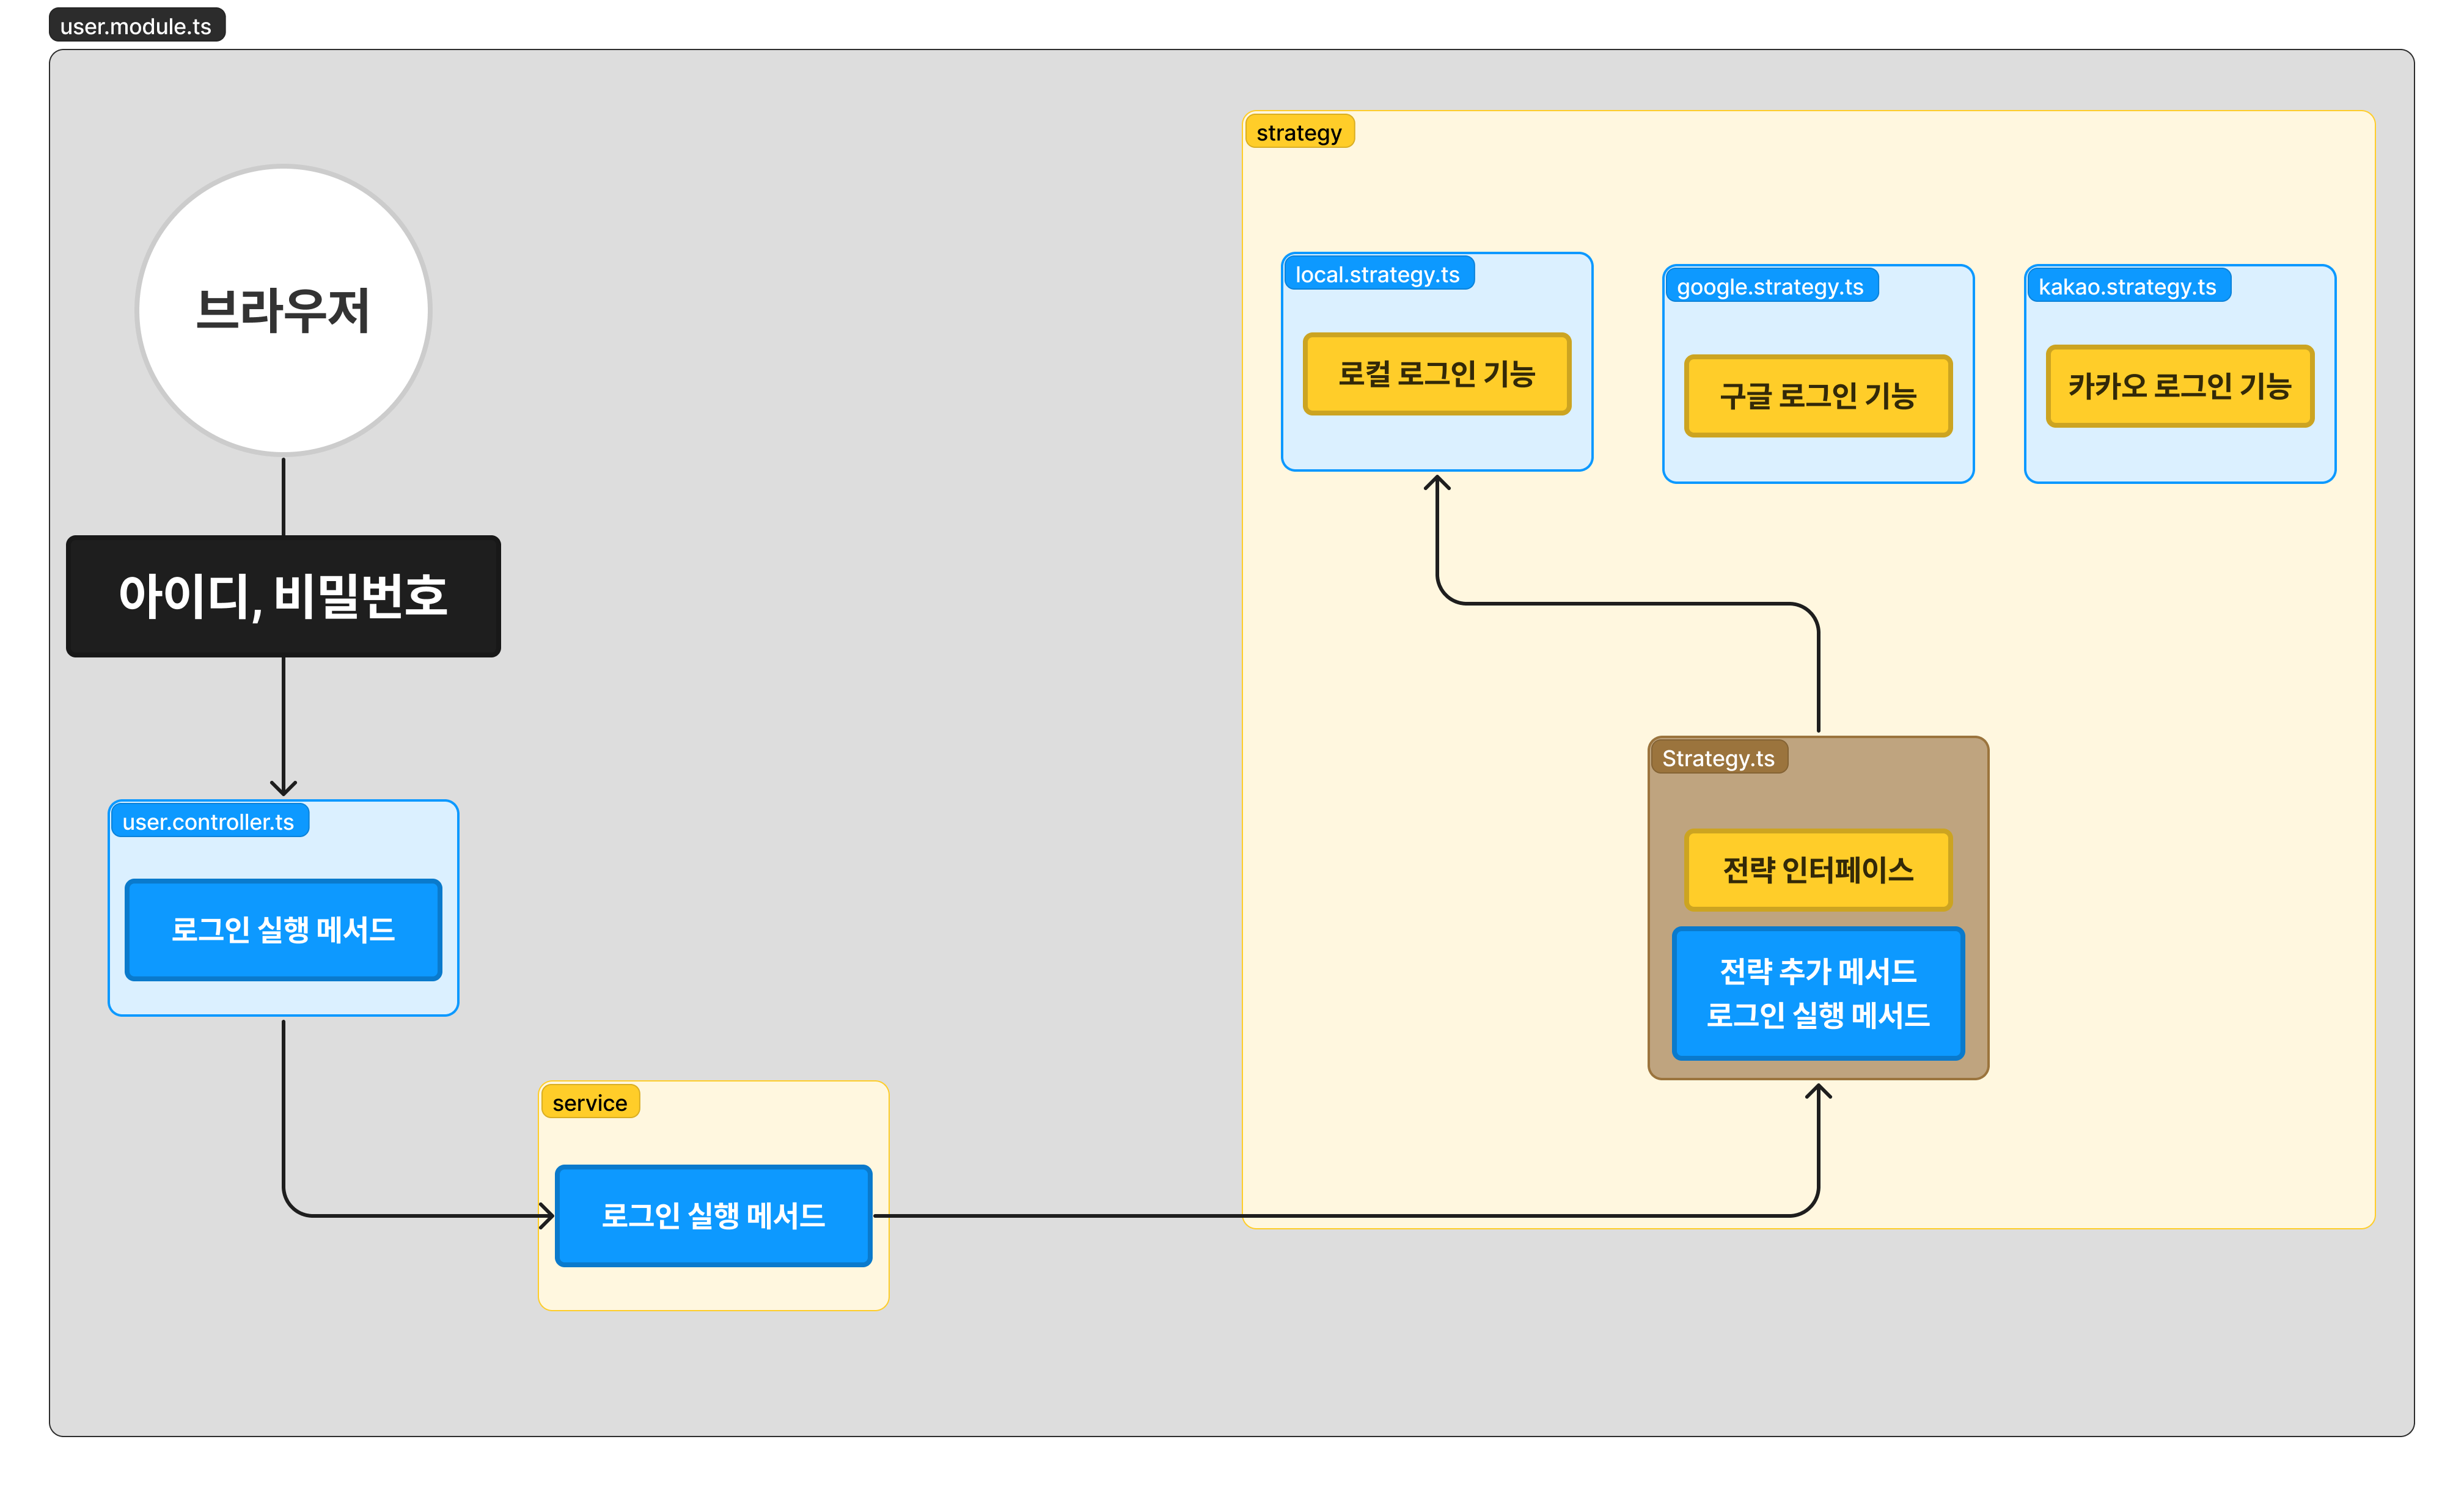
로컬 로그인 응답

'JavaScript > Typescript' 카테고리의 다른 글
| 타입스크립트 문법(2) (0) | 2023.04.20 |
|---|---|
| 타입스크립트 문법(1) (0) | 2023.04.19 |
| 타입스크립트 실습코드(OOP) (230419) (0) | 2023.04.19 |
| 타입스크립트 기본설정하기 (0) | 2023.04.18 |
| 타입스크립트(Typescript)란? (0) | 2023.04.18 |